After months of dithering I decided to give it a try.
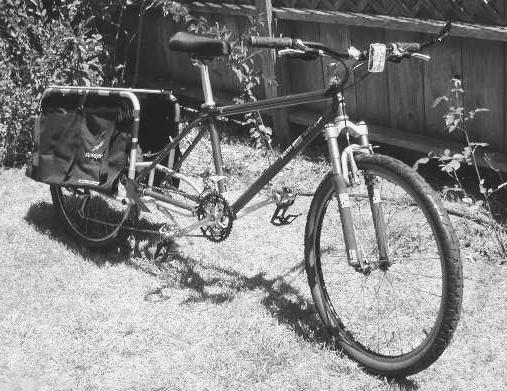
The Free Radical is a bolt-on (no cutting, no welding) kit which extends the wheelbase of your stock MTB or road frame by 15 inches, moving the rear wheel back to accommodate something rather like a giant industrial-sized rear rack. It just about doubles the length of the "rear rack" area, in other words, which means that you can carry more stuff.
You end up with a wheelbase shorter than a tandem, comparable to some recumbents. The bike will weigh quite a bit more when you're done, too. However, the added weight of the Free Radical (a bit over 10 pounds) is less than that of my beloved Donkey trailer. Cargo is carried in two capacious canvas slings. I made a little photo gallery of this bike, including some details of the frame construction. This document is the amplifying text.
Ordering the Free Radical was very easy. I looked at the web site, decided which parts to purchase, contacted Xtracycle by email (very responsive people), and then faxed an order. The company is in California, and I had my kit within just a couple of days. It was shipped in a large flat carton, which had been opened to stuff in a couple of extra pieces I ordered and then taped shut with duct tape :-) Although the carton looked a bit rough on arrival, all the parts were intact.
The basic parts are the welded steel frame, two lightweight alloy U-frames which support the cargo slings, and one lightweight wooden deck which functions like a conventional rear rack (only much larger). I found all these parts to be in excellent condition out of the box. I thought at first that assembly had been farmed out to China to keep the costs down. Kipchoge Spencer of Xtracycle wrote to say they actually have the frames made in Taiwan, and there's quite a difference between outsourcing work to mainland China vs Taiwan:
There's a big difference. Taiwanese working conditions are similar to those in the States, and workers there are paid American level wages. We went to Taiwan after struggling for two years to do the manufacturing ourselves and/or find a contractor in the States that was up to the task and willing to take us on at low volume. Price was a driver, but not the primary one.
The manufacturing quality is closer to the upper than the lower end of offshore welding and fab. The welds on the frame were not artistic, but they seemed sound. In one or two places I would have preferred a bit more grinding to smooth down some scruffy bits on the weld bead; these were not ground down, but just painted over as-is. The paint job is nice -- a muted silvery gray that will not clash with any colour of main bike frame.
While waiting for the kit, I was seeking a "donor bike" -- a frame on which to hang the Free Radical. The folks at Xtracycle recommend a steel frame, for strength and flexibility. You can see from the design that a fair amount of extra stress is placed on the frame. I had just sold a recumbent to partially finance this project. So having a little infusion of capital from this sale, I decided to try to find a good light steel frame so as to keep the overall weight down. No clunkers!
My search for a good steel frame was a bit frustrating. In the end I picked up a (very) used "Yo'Eddie" by Chris Chance -- hand made, thin wall light steel, excellent quality -- with all XT componentry. It cost a bit more than I had wanted to pay, but it was light and strong and would probably last a lifetime (whether connected to a Free Radical or restored to normal MTB shape). If the Radical didn't work out, I felt I would still have a good bike. The Yo'Eddie is a nice ride; I rode it for a couple of days before starting the project. Unfortunately it has been thrashed, but the frame was not bent (except for some tweak in the rear dropouts). Of course I ended up replacing a bunch of stuff: the stem, both tubes, both tyres... and I am sure there will be more.
The instructions provided with the Radical were, I found, pretty easy to follow. The 3D CAD pictures were not, perhaps, as useful as ordinary B&W shop manual pictures. But it was not difficult to figure out how to proceed. The process was broken down into simple steps, with very clear warnings about what not to do. I cut the old cables and removed the rear wheel, rear derailleur, and rear brake, and broke the chain: now I was committed to the project!
Though the manual suggests building the Radical with the bike upside down, I found it was not difficult to assemble it right way up. The bike was on a primitive ministand lifting the rear wheel a few inches off the ground; I set the Radical frame on blocks to approximate the same height. This was when I discovered the slight bend in my rear dropouts, and this was worrying; but the Radical seemed to bolt on just fine, and it aligned well with the main bike frame.
The "tongue" (foremost part) of the Radical frame lies on top of the chainstay bridge (if you have one -- Xtracycle offers an adapter kit if your frame lacks this feature). In my case the bolt that holds things together at this point had to go behind the bridge. The Radical was just not quite long enough for me to put the bolt through forward of the bridge, even though that seemed somehow better and more secure to me intuitively. I think there should have been one more washer supplied for this assembly, but I have a pretty good stash of fasteners at home so this was not a big problem. I don't much like the rubber coating on the plate which backs the tongue. It rucked up during tightening.
Attaching the Radical to the bike frame is actually the easy part! It took very little time. Setting the rear wheel into the Radical's dropouts was also not difficult. The laborious part was rerunning longer cables and trying to get the rear brake and derailleur working in their new locations. Part of this difficulty for me was my lack of experience (I often adjust brakes or derailleurs but have actually never -- I blush to admit -- installed them from scratch). The Radical was a bike maintenance learning experience for me! In fact Xtracycle suggests that you let a pro build this kit for you, and the retuning of brakes and rear shifter may be why.
I spent a fair amount of time struggling with cables, cable housing, etc. This took far longer than the actual frame assembly. I did quite a bit of head scratching trying to figure out how to make the brakes work (and they still don't quite work right) with a much longer exposed cable run. I got the pads aligned OK, after some adjustment, but the rear brake is a little sticky now (doesn't always release properly).
Breaking the chain and extending it with the (supplied) additional chain length was not difficult. I was a little alarmed to find that the supplied chain was an off-brand (i.e. not Shimano IG) but it was narrow and the links had the IG-like shape, so I installed it and crossed my fingers. It seemed to work more or less OK, but I replaced it with Shimano chain at the earliest opportunity.
Joining the lengthened chain however, on the bike, was an oily-fingered cussing session. I finally figured out a trick: rope the loose ends together with a spare bit of cable. This takes the strain so you can align the ends in the chain tool and apply the magic Shimano rivet. It turns out there are three famous ways of fitting a chain, and I picked the tough one. Live and learn :-)
The kit comes with a Rollamajig for the rear derailleur cable. I managed to install all of this more or less right (remember I am not an expert bike mechanic, just an occasional DIY fixit type). I managed to get the rear derailleur to shift reasonably well, but I'm not satisfied with the transmission as a whole. Despite following Barnett's manual as closely as I knew how, the chain seems a bit slack and the rear shift is noisy. I will be taking the completed bike to the LBS to ask for some advice and help getting it properly tuned.
[Results of tune-up: installed the correct length of cable housing for rear brake (what was supplied with the new cables in the kit was not long enough); removed one chain link; got some help tweaking the rear derailleur. Bike now shifts quite well.]
Despite various snags and frustrations (all to do with cable running and tweaking, not to do with the kit itself), I got the basic bike built in one evening (from about 5pm to midnight). But don't be alarmed -- that included much staring at Barnett's manual, frustrating attempts to cut cable housing without the right tools, disassembling indexed shifters of an unfamiliar type, adjusting worn-out brakes, and a lot of cleaning up of the mud-encrusted parts that I was taking off the bike, prior to remounting them. The folks at Xtracycle say that a pro bike mechanic can breeze through this operation in just one hour the first time, and as little as 30 minutes for subsequent projects. More than half of my project was used-bike restoration.
The following morning I fooled around with the rear derailleur some more, tightened up the main frame bolts one more time, then took the bike out for a test ride. This was a minor thrill -- it actually rode quite well. I perceived the long wheelbase only as a change of timing in the thump of the wheels going over potholes and so forth. Instead of the "ker-thump" which years of riding have conditioned me to expect, I would hear and feel a "ker-pause-thump". I found this strangely entertaining -- much more fun than listening and feeling for the (possibly bad) behaviour of a trailer out behind the bike.
After a few blocks of test ride I returned home and put the luggage on the bike. This was super-easy. In fact, everything about this kit is super-easy except re-tuning the brakes and rear shift. The kit itself is admirably designed so that "even an idiot" can assemble it quickly and without ambiguity or confusion.
The two cargo slings are suspended from light alloy U-racks. The prongs of the U-racks slide into the open ends of vertical tubes on the Radical frame. This is easy and simple, even though the manual suggests that it might be tricky. The wooden rear deck snaps (simple and easy again) between the upper spans of the U-racks, holding them apart and stiffening the whole rear assembly nicely. (Folks at my local bike shop suggested putting skateboard wheels on it, for even more functionality!) One might want to attach padeyes (or drill some big holes) to permit attaching bungee cord hooks to this deck.
The cargo slings are then tensioned using a strap at each lower corner. The instructions for running and tensioning these straps are admirably clear.
Lastly, I added the very sturdy kickstand supplied with the kit. Again, the instructions for this step were admirably clear and to the point. The stand is heavy, but worth the weight.
Having added the luggage, I was now ready to go shopping -- the raison d'etre of this project.
One advantage of the Free Radical over a trailer was immediately obvious. Unloaded, it rides beautifully. An empty trailer is always a bit of a headache, being too bouncy and light and having a tendency to tip over if mishandled. The Free Radical, unloaded, rides like a slightly heavy bike with a slightly springy frame. It is a pleasant ride and I enjoyed not having to slow down (as I do when towing an unladen trailer).
I did not find that the longer wheelbase made the bike unwieldy. While there was some perceptible reduction in nimbleness, it was not annoying or restrictive to me. For normal road riding, I think the bike is perfectly fine, as manoeuvrable as one could reasonably require. It felt more nimble than the last LWB 'bent I rode (a Tour Easy) which made me nervous because of its "majestic" handling characteristics. By contrast the Radical felt much more like a regular bike, only slightly "softer".
I locked the bike up at the store and found that the 15 inches of extra wheel base did not seem too obtrusive -- there was still plenty of room for pedestrian traffic to pass by. It was far less obtrusive than a trailer left attached and locked to the bike.
It seemed odd to be using a shopping cart. For the last year or so I have always brought my Donkey trailer into the store and used it as a cart. The refrigerator and pantry at home were getting pretty bare, so I decided to challenge the Radical with a serious shopping trip. I bought four bags of groceries, including a lot of heavy stuff like juice, canned soup, milk, etc.
Once more outside the store, I found that the Radical's cargo slings are sized "just right" for four supermarket bags. I relaxed the outside top straps on the slings a bit and disconnected the centre one, to open them up. Then I started stuffing bags in. This is a two-handed operation so it's a good thing the bike is very stable on its kickstand. After getting two bags in, I found I could re-fasten the centre strap in between them. The bike remained stable on its stand even with all four grocery bags loaded.
At first I was worried about the open ends of the cargo slings. But in practice, the grocery bags were pretty much "seat-belted" in by the support straps. Two people stopped to stare and ask questions during this process. Finally, after satisfying both their curiosity and my own concerns about the security of the produce, I unlocked the bike and wheeled it away.
Wheeling the bike loaded, I was very conscious of the amount of weight on the rear wheel. Care was needed to keep the bike from flopping (as with any bike when heavily loaded with rear luggage). I rode away cautiously, not sure how it would handle.
It did handle quite differently when loaded. The extreme weight on the rear of the frame made the front end feel very light, as you might expect. So the steering felt light and a bit squirrelly, but the bike still tracked well. I could feel some vertical flexing in the compound frame, and as the cargo swung a little bit in the slings there was also a small sideways flexing at odd moments. After a few tens of yards and a pot hole or two I felt I had a handle on its behaviour, and started to ride at normal speed.
The bike of course felt heavier and more constrained than it does when pulling a separate trailer. On the other hand, there were not the disconcerting delayed "rubber band" stresses transmitted through the trailer coupling. I found it pleasant to ride faster, without the usual concern for the trailer out behind. The bike was a little more tender at stops; with all the weight on the frame, getting even slightly off-balance is a concern. On the other hand, I felt more comfortable negotiating bad pavement (of which we have more than our share in my town) without the trailer bouncing and rattling along behind me; it was nice not to have to think about the separate tracks of four wheels when avoiding pavement nasties, but only about two. Although the Radical actually has a slightly wider profile than my Donkey trailer, I felt this almost as an advantage. The bike looks bigger and I think motorists gave me a wider berth than usual.
On returning home, I found that it was slightly less convenient to unload the Radical. With the Donkey I would just detach the trailer and wheel it into the kitchen with its cargo; it is not hard to pull the trailer by hand up the three steps to my front porch and the one half-step into the house. With the Radical it was obviously impossible to carry the loaded bike indoors, so I had to remove the grocery bags in pairs and carry them inside, then bring the bike in. Kipchoge says that some FR riders do carry the whole bike, lifting it by the top stay of the add-on frame. How much cargo you can carry along with the bike depends on how buff you are, I guess :-)
On the other hand, there was no trailer to stow, and the Radical (barely) fits in the small room where I park the bikes. So there is a little less hassle at the end of the day.
Offhand I would say that the Radical vs the Donkey, in terms of effort, is a zero-sum game. What I like about the Radical is the slightly lower hassle of setting out (don't have to retrieve and attach the trailer, the bike is ready to go) and stowing. Also, if I go shopping without a fixed plan, I don't know whether I will buy stuff that needs a trailer or not. I'm not likely to haul around an empty trailer just in case! With the Radical, it is very little extra effort to bring along as much cargo handling capacity as I could reasonably require.
Over all I rate the Free Radical kit very high for good design, ease of installation, and above all non-destructiveness -- it is easy to restore the bike to normal again if one wants to move the Radical to a different bike, sell it, or whatever. The original bike is unharmed.
There are a few design issues which bother me a bit. There are upward-facing openings in the frame which I am sure will collect water when the bike is used in the rain. I did not see any provision for drainage of water that gets into the frame. I will seal these with some kind of tape for now.
Where the U-frames are seated, aluminium is in direct contact with steel and this interface can get wet. There seems to be a good probability of electrolysis and consequent death of the alloy tubing. Keeping the joint dry will slow this down, but I'd like to see a Delryn or other plastic end piece on the U-frames where they enter the main frame. Kipchoge says that yes, it's not a good idea to leave the V-racks in the frame for long periods, particularly if they are wet.
The rear deck and cargo slings house the rear wheel in a kind of "tent" which, in wet weather, is likely to become very dirty and crusty. I can't think of any way to avoid this; it seems difficult to fit a mudguard in as well, but Kipchoge says it can be done. I wonder how water-resistant the underside of the deck will prove to be, and whether it will warp in wet weather. I would like to see an alternative "foul weather" deck, perhaps made of alloy or plastic waffle grid for lightness.
I wish that Xtracycle would offer a choice of chain brands so that one could match the existing chain exactly. The Taiwanese chain they ship (KMC) has a mixed rep. Mt Bike Reviews site has a number of quite negative reviews of KMC chain and its average rating is lower than Shimano; but Sachs scores higher than both. If you have all-Shimano drive train, it's probably best to use Shimano chain -- so says my LBS. Anyway, this KMC chain is pretty low-end stuff.
I would not put this kit on any bike without V brakes. As with a loaded trailer, considerable braking power is required to ride safely with heavy cargo.
The long cable runs to the rear obviously present more friction than you find on a stock bike, but they are no worse than, say, those on a tandem. I would think that a Radical owner should talk to friends or bike shop folks about the standards to which tandem owners maintain their cables, etc.
The finished bike is fairly heavy. A Ti Radical would be horribly expensive I'm sure, but what an amazing bike it would be :-)
I will have to use this bike for a few months to know how practical it really is. On its second shopping trip (for just a couple of items) I found out that a loaf of bread could fly out of the cargo sling when going over a major bump :-) something else to think about. Offhand I would recommend putting lightweight small cargo inside another carrier bag of some kind, and securing that to the bike (say, by buckling the cargo sling straps through the handle of the carrier bag).
At the moment, with only this initial experience, I think it has great potential as a shopping and hauling bike for ordinary utility cyclists who cannot afford a purpose-built cargo bike. This was exactly why it caught my eye, as I web surfed looking for a cargo-hauler. Kipchoge, on the other hand, says
It's interesting you mention this. I'd estimate that 1 percent of our sales are to people who are looking for a less-expensive alternative to a purpose-built cargo bike. The others are interested in a bike that goes where regular bikes go (streets and trails) and handles similarly, but that also add a big dash of utility and passenger-carrying goodness. We don't think of it as an alternative to a cargo bike as much as an alternative to a regular bike.
So far, folks who have test-ridden this bike are favourably impressed -- it rides and handles well for its wheelbase, like a high-quality modern tandem. It is quite stiff and most people find it lighter than they expected on first sight.