Tanked oxygen in particular is (imho) a rather unnerving roommate. Tank pressure is so high that if the valve fittings are breached by impact (as in, your tank fell over, the protective cap wasn't in place, and the valve assembly hit something hard) the tank will be propelled by the oxygen pressure at velocities high enough to penetrate a brick wall. This is also known as the "green torpedo effect." A sudden high-pressure oxy leak in an enclosed space with a live flame is also not a comforting thought.
OK, I admit that's being a little paranoid. Thousands of lampworkers, welders, and other professional pyros work a lifetime, many tens of thousands of hours at the bench, without ever having an accident; and only the more jittery among us feel afraid of our familiar oxy cylinder. But there's more than hazard to sour the relationship. Oxy tanks are big and heavy. They are fairly expensive to rent and very expensive to own; they run out at inconvenient moments. Any high pressure gas installations requires the best quality regulators, valves, and hoses for safety, and it all adds up to a fair amount of hassle and money.
For several years, some lampworkers have been exploring an alternative to tanked oxygen (at the end of this article I'll discuss an alternative to tanked propane as well). An affordable alternative is the DME (durable medical equipment) oxygen concentrator.
This is a fairly small (about small trashcan-sized) device consisting of a compressor, a couple of molecular sieve beds, and some control circuitry packaged in a rolling enclosure, with an intake (usually coarse-filtered) and an output nozzle. The molecular sieve is a material (like zeolite) which under compression absorbs nitrogen, and when decompressed releases it again.
The way the concentrator works is to introduce air into a compression chamber containing the sieve material. It's then compressed, and the sieve drinks up the nitrogen. When you filter nitrogen out of terrestrial atmosphere, what you have left is mostly oxygen, plus some rare gases and pollutants. This mix, which in the average concentrator is as pure as 80 to 90 percent oxygen, is exhausted at the output nozzle. When the chamber decompresses, the nitrogen is released and vented from a separate exhaust.
The two chambers operate on a regular cycle like a two-cylinder engine; when one is "inhaling" the other is "exhaling" to provide a fairly even flow of nearly-pure oxygen to the output. This output is used for the maintenance of patients with severe pulmonary disorders. DME oxy boxen are usually found either in intensive care trauma situations, or by the bedsides of (often home-bound) sufferers from terminal emphysema, lung cancer and similar diseases.
Like most medical equipment and supplies in the US, oxy boxen are horribly overpriced when "rated" and new. Admittedly they have to include extra HEPA-type filtration for medical use, since the type of patients they serve are exactly the type who cannot tolerate contaminants in their air. But even so, the new prices of $4000 and up are pretty outrageous. On the used and reconditioned market, these machines drop down to anywhere from $200 to $600.
One way to get hold of a good deal on a DME concentrator is to watch your local obituary pages, since they are usually sold right after someone dies. This is a bit too ghoulish for most of us though; a less bizarre and offensive strategy is to watch ebay. There are always concentrators for sale on ebay, probably for the same sad reason; but at least the people are strangers and one doesn't feel quite so much like a grave robber.
You can run a small torch, like a Minor Burner, off a DME concentrator rated at 5-6 lpm (liters per minute). You will almost certainly not be able to run a large torch. One Glassline list member wrote, "I experimented using two units to power a Carlisle... I guess all I can say about the experience is that it was fun trying it... the cannon barely whispered out a flame." We can assume that each unit was putting out 4-5lpm cranked up to max, so 8-10lpm was far too little flow to keep the big flamethrower happy.
Another GL member said "I scrounged up an 02 concentrator yesterday. It only has 2200 hours on it... it fires up my National with a #5 tip, and it also fires up the Nortel Minor. For Pyrex, both torches are usable but on a very limited basis... both torches put out way more than double the heat when hooked up to the bottled O2 at 2 psi! Despite its limitations I am very pleased... there are several daily tasks that do not require large flames and I am confident that I will pay for the machine in saved o2 withiin 6 weeks. But... it severely limits already limited torches."
The limitations acknowledged above should warn off any glass workers with big torches or a serious boro habit. That leaves those of us who work soft glass and can live with a small torch. This group of lampworkers may find a DME concentrator a very viable alternative to tanked oxygen.
The advantages are easy to list. There are no heavy tanks to transport. The oxy is low pressure, which means you don't even need a regulator (in fact I have heard that some regulators will not work with a concentrator; they will shut off the gas due to the very low pressure). There is no pressurized gas risk, and even at maximum output the oxy box cannot pump enough oxy into your room fast enough to cause any real fire or explosion hazard. You don't need to be quite as paranoid about totally grease-free fittings. But best of all, like an on-demand water heater, it never runs out of gas. It will sit there and pump out 80-90 percent pure oxygen until the sieves wear out.
Those who can live within the flame size and heat limitations of the box are often delighted with the setup. Nancy from Glassline says "I am using my 'born again' medical O2 concentrator with my Minor Bench Burner and LOVE it... I think the 'foxy oxy box' is the way to go... No watching the gauge on the O2 tank drop... it is wonderful hearing the little plunk, plunk as the solenoid switches back and forth between sieve beds."
So, if you fit the profile of the ideal DME oxy box user -- a soft glass worker who works fairly small -- and you are interested in buying an oxy box, what would you look for?
DME oxy boxen can be rated on several axes of quality. One is output capacity. 6lpm is about the top of the line for the smaller units. The medical application just doesn't call for a higher flow than this. There are large high-output, industrial oxygen generators for big hot shops and welding shops, such as the well known Air Sep units; but they are in a whole different price range, several thousand dollars per unit -- well out of reach of the small-scale lampworker.
Another important specification is purity. Most units can't put out 90 percent pure oxygen at their highest flow; typical numbers might be 85 percent at 5lpm, 90 percent at 4.5lpm, and 95 percent at 4lpm for a unit rated 5lpm. All other things being equal, you should obviously go for the highest flow rate you can find; if you run it below its maximum rating you will get better purity, and since the torch will be oxy-limited, you want all the flow you can get.
The age of the unit is relevant. Purity declines over time as the sieves slowly lose their molecular resiliency, so the unit also has an operational lifetime before it requires new sieves. These are expensive; few individuals would pay a high rebuild cost rather than pick up another cheap used unit. For example, a complete rebuild including sieve replacement can run around $300, and a used unit can be picked up for $200 and under if you're not too picky.
DME oxy boxen are therefore a lot like used cars -- mileage counts. As with cars, you may find yourself buying "junkers" and deliberately running them into the ground, rather than investing a lot in a high-end unit and paying correspondingly high maintenance costs. Even an old unit, unacceptable by medical standards, might serve a lampworker for several years (see below).
When looking at a box, you should find out its specs (purity at various lpm), its manufacturer and year, and the number of hours on the unit since the last rebuild. "Rebuild" can mean different things, too; some vendors say a unit is "rebuilt" if it has new seals, internal hoses and O-rings and the compressor has been overhauled. This is not dishonest, but make sure you also find out how many hours are on the sieves.
Typical lifetimes for the sieves vary from 20,000 to 40,000 hours. Remember that these boxes are intended to sit beside a bed or chair and run 24x7 for perhaps several years. A pro lampworker would typically turn the box on for 8 to 10 hours per day (depending on what a demon you are for sitting at the torch), and a hobbyist would use it perhaps 20 hours a week. This is a very light duty cycle for the design.
Let's say you buy a box with 15,000 hours left on it. This would be typical of a 21,000 hour model (lower end of the market) which had been run for 6,000 hours (250 days, the better part of a year) and then sold (let's not get into why, OK?). So if you were to use this unit 40 hrs a week, it would last (in theory) 375 weeks or about 7 years. Now we want to compare the cost of the unit (add a bit for the electricity to run it!) with the cost of oxy over the same 7 year lifetime.
In correspondence with several different lampworkers with varying torches and work habits, I've pegged the cost of tanked oxy somewhere between $.50 and $3.00 per hour of bench time. It varies significantly depending on how hot you work, how big your torch is, etc. I'm going to use $.50 per hour here, because it's a nice easy number and because we're assuming our ideal DME oxybox user is working small, with soft glass and a Minor Burner... we'll give tanked oxy the benefit of the doubt.
That cost per hour is exclusive of the buy-in, which is about $125 for a smaller-size oxy tank, $160 or so for a big size tank, and $60 or so for the regulator. A tank plus regulator is cheaper than most, though not all, DME oxy generators.
So let's say you bought a big tank and a regulator ($220) and then purchased enough oxy to run the same Minor Burner for the same 15,000 hours. It would cost you $220 + $7,500, or about $1100 per year for your seven years of serious full time work.
If you did the same 7 years of 40 hour weeks with a DME oxy box, you could spend from $250 to $600 buying the box. Thereafter you'd pay for the electricity. These boxes pull about 200w in operation, so every 5 hours is one kw/hour. 15,000 hours is 3,000 kw/hr at the outrageous contemporary unregulated price of, say $0.20 per kw/hr. You'd pay about $600 to your local power company to get your oxy.
So you would have spent a maximum of $1200 over 7 years. That's figuring that your box never dies, never needs repair, never gives out when you need it most. If you were a pro, you'd almost certainly buy two, one for a spare. Now your costs go up to a worst case of $1800 over 7 years, or abot $260/year. You're paying about one fourth as much for your oxy as the person who uses tanks. The hobby lampworker who bought only one oxybox (and that one a cheapie) would of course be saving even more.
We should also bear in mind that tanks involve some other costs that vary a lot from one person to another. Not everyone can get delivered oxy. Some need to figure in their time to run to the welder's supply to get refills. All tank users need to consider their time spent connecting and disconnecting tanks, spent checking for leaks, and so forth. Anyway, the "win" seems pretty clear.
So, you decide this is a great idea. You make a successful bid on ebay, you mail someone some paypal money, and a week or so later this large box shows up on the doorstep. Now what?
First, of course, as with anything you just bought, check it out a little so you can let the seller know about obvious damage. Many units have an oxygen purity meter on the front. If this is present on your unit and the seller claims it works, you can put the unit outdoors or in a ventilated space and just run it for a while. It can take a minute or two for the oxy purity to rise to normal operating level, so don't panic if the meter reads in the red or near zero at first.
You can check to make sure that the flow control knob on the front works, i.e. you can shut down the flow and open it up again. Most units will have a ball gauge flowmeter, and you can check that this meter does rise and fall as you open and close the flow valve. You can also listen to the unit and see how noisy it is, if there's anything rattling, etc.
This noise question is not a trivial one. One virtue of tanked oxy: it's very, very quiet. Silent in fact; you hear the whisper (or roar) of your torch, and that's all. No box with a compressor in it is going to be silent! But most DME oxy boxen are heavily encased and fairly quiet, since they are intended for sickroom use. I happened to buy a brand that is known for being noisy (oops), and it's a bit of a beast to share a small space with. In my personal setup story below I'll reveal what I did about that.
The noise level of the box will determine how close you want to sit to it and therefore how much hose you'll want to use to bring oxy to the torch. Some users put their boxes right under the bench (those are either quiet boxes, or very tolerant lampworkers). Others banish theirs to a neighbouring room! I talked to a guy who repairs these pups and he told me a story about a Foothill (that's the brand I bought) in medical use that had been moved to the opposite end of a 50-foot-long hallway to get the noise away from the patient.
You can listen to the box, and sit near it for a while, while it's "warming up" to produce oxygen. You will probably notice the sweet smell of oxy in the air as it settles down to its task. Some people test for the presence of oxygen using a lit cigarette or a match. I don't recommend this. I'd much rather use the torch to test the oxygen output! Once I've verified that there's cool gas of some kind coming out the spout, and that it smells like oxy, I'm ready to connect it up and see what happens.
The connector on the front of the oxy unit will vary from one brand to another. Mine has a plain tapered plastic fitting -- rather like a wine barrel spigot, but smaller. Over this you can push-fit clear PVC tubing from the hardware store, the 1/4in variety. It makes a good seal, as you'll find when you try to pull it off later. Other units might have threaded brass fittings, a quick disconnect, or almost any kind of nozzle, so be prepared to make a trip to the hardware store and to do a little ad hoc plumbing.
Because the pressure is so low, you won't need a regulator. Some folks use quick-disconnect spark arrestor fittings. I dispensed even with this and ran the PVC tube to a brass double barb fitting, directly into the torch oxy hose. I doped the fitting with teflon tape; remember this is low pressure, so leak prevention is not the white-knuckle experience it is with tanks; air tight is good enough.
How I've been using my unit, and how I think most people use theirs, is to turn it on to max or near max output, and regulate the flow at the torch with the O2 valve. I have heard some people say they worry about back pressure in the unit, but so far I don't know of any lampworker who has damaged a DME unit by this usage pattern.
The first time I turned it all on, the procedure was as follows:
After several sessions I got tired of the venting ritual and just lit the gas, then let the box blow first air, then gradually improving oxy, into the flame. The only caveat is that you don't want to open the O2 valve too wide during this operation, because the impure air mix can blow out the flame! You'll see interesting things as the air creates first an invisible (clear) zone at the base of the flame, then increasing blueness, then finally a normal oxy look.
You should find that you can produce a normal, fairly focussed blue flame about 6 in long from a Minor Burner. What you won't be able to do is crank up the oxy until you have a malignantly hissing blue-white "welding torch" flame 6 inches long. If you want super-oxy-rich flame, it will be small. If you want a super big flame, it will be reducing. This sounds a bit constraining, but in practise I have not found it too limiting for soft glass.
Everything you see on my glass web pages was made with a DME oxy box (except really early beads which were made with a Horrible Hot Head!), including marbles up to about 1.5in diameter.
I'm just a hobbyist lampworker and have not even been doing it very long. So experienced glassworkers may get a bit of a giggle out of my "strictly amateur-night" workspace. However, it works for me and I have a lot of fun!
Like many novice lampworkers I dipped my toe in the waters by getting the lowest-cost torch available for lampworking: the (in)famous Hot Head. I'm really glad this torch is available, because I might not ever have started lampworking if I had faced a $160 torch purchase (for the next step up, the Minor Burner) at the very beginning. However, as I was warned by more experienced people, one soon outgrows the Hot Head. Its flame is bushy and imprecise, and it's generally a pain to work with; also, the MAPP gas on which it runs is availably most readily in rather expensive little 1-pound canisters which only last 3-4 hours each. Despite all these drawbacks I got a good start with the Hot Head. But it was a love/hate relationship with that torch.
After enough people said, "Just get real. Get a Minor Burner. Get a clue," I finally found a used Minor Burner and almost simultaneously made contact with Robert Haima, a lampworker who runs his Minor Burner off house natural gas (as opposed to higher pressure commercial natural gas) and a medical oxygen concentrator. I had been thinking of trying to run the Minor off house gas, but a couple of people had told me it just couldn't work, the pressure is too low, the torch won't get hot enough, etc.
Robert's success story inspired me to get cracking and try the great house gas experiment. I located a very inexpensive used medical oxygen concentrator (made by Foothill, and I would not recommend this brand to others because of the noise). I found it on Ebay, offered by a fellow who reconditions and resells these type of units. You can write to me personally if you want his email address.
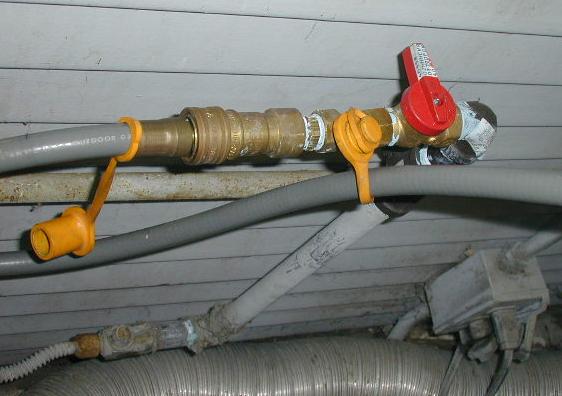
I bought it; ordered a standard 1/4in torch hose set from Arrow Springs; went to the hardware store and grabbed some useful gasfitting parts. I stared at the gas stub that feeds my drier. It's not valved. I'd have to drop the whole house to work on it. I had unpleasant fears about a day or so with no hot water and no cooking... finally I chickened out and had the hard-plumbed gasfitting done by a professional. At times I have hired a contractor and then regretted it, but in this case he really did do a better job than I would have -- experience counts!. What I ended up with looks like this:
This is what you see when you look behind the drier. I added a pickoff that rises a couple of feet, then an elbow that terminates in a quick-disconnect. Note that this stub has its own shutoff valve! I think this is very important. If you plumb your torch to house gas I would definitely not use the torch valve as your only shutoff. I turn off the gas at this shutoff after every session, for two reasons. First, I don't trust the torch valve to hold pressure 24 hours a day when I'm not using it, when I'm not home, when I'm asleep, etc. Second, I don't trust quick-disconnects either. I don't want pressure on either of those vulnerable points during any long period when I'm not physically present to notice the smell of escaping gas.
I guess I should also say right here that I'm not advising you to start hacking on your natural gas lines. Although house gas is relatively low pressure, it is potentially hazardous both in a respiratory and inflammability sense, and you should not fool around with it unless you have experience with the relevant tools and procedures, a handy fire extinguisher, good ventilation, and a solid, well-thought-out plan including a fallback in case you damage an unvalved pipe, etc. In other words, I'm not recommending that anyone else do what I did, just telling you about my own setup. My lawyer made me say that :-)
Anyway, after leaving the pickoff at the quick disconnect, the gas line is taken up high and suspended from the ceiling, because the last thing I wanted was gas lines on the floor just waiting to be stepped on, to roll underfoot and trip me up, etc. The hose travels over the washer and drier and is suspended from a support beam

along with the oxy line from the concentrator. This suspension is arranged so that the splice connectors (the most vulnerable point of the whole gas/oxy feed) are safely off the floor and away from tools, flames, water, etc. From this point the lines wrap under the bench and approach the torch from behind and beneath, so there is no loop of hose underfoot when I sit at the bench.
The oxygen concentrator sits as far away as I could put it, which in my small space is not far! I used about 12 feet of standard 1/4in ID clear vinyl tubing to connect it to the splice into the torch hose.

The tubing rises up to join the torch hose above, at the support beam, as you saw in the previous photo.
I wrestled with the flaws of my Foothill unit -- vibration and noise -- for some time. At first, the vibration was such that murrine slices warming on the torch marver would actually walk right off and fall onto the floor; the tools and glass rods were rattling on the bench. This was obviously unacceptable.
I built an isolation pad for it, using two layers of large-size plastic bubble wrap under a solid slab of 1-inch pine plank. I set the unit on top of the pine plank, isolated from the wooden floor by the bubble wrap. This solved the vibration problem; but it was still darned noisy.
I found that after several hours at the torch, my ears were ringing slightly from the constant compressor growl. I felt I had exchanged the annoying roar of the Hot Head torch for an equally annoying mechanical noise. Finally I took action.
I improvised a minimum-footprint quiet box for the oxy concentrator. I used the heavy cardboard crate it was shipped in: cut the flaps off one end, lined it with styrofoam from the original packing material -- there is now about 1 to 1.5 in clearance all round -- cut a door in the front to access the controls. The resulting padded crate can be lowered over the oxy concentrator from above. I raised the crate up on little woodblock feet to allow air to circulate from below. This attenuated the operating noise considerably, so that I can actually hear my torch flame when sitting at the bench. If I had it all to do over again, I would not buy this brand or model of concentrator; but the price was right and I think I have adapted it sufficiently to live with for a year or two at least.
I have used this setup for several months now. Although my torch flame is not quite as hot as you can get with propane and oxy, especially with propane and tanked oxy, it is an enormous improvement over the Hot Head! Since I choose not to own a car, it saves me a lot of hassle not to be carting heavy cylinders around with my bike trailer; and even if I had a car or truck, there's no guarantee that I wouldn't run out of tanked oxy or gas at inconvenient times like late on a Sunday evening! With this setup, I never really worry about how long I sit at the torch; it is costing me very small numbers of dollars per hour. In fact, the biggest cost of my bench time is keeping the electric annealing kiln hot -- especially since the recent rate hikes.
Thanks to this somewhat funky setup, my glass habit has had a minimal impact on the number of errands I have to run and the amount of money I spend on fuel. I spend spend my "glass time" actually working glass, not fussing with tanks, and I spend my "glass money" on glass and tools, not on oxygen. If I could run the whole thing on vegetable oil instead of fossil fuel, I sure would -- but for now, this is the most economical setup I could engineer from the resources available to me.
If I were a production shop, the slightly slower melt times of my slightly colder torch might reduce my productivity to the point where I'd invest in tanked gas and oxy to increase my throughput. I am not sure exactly how that math works out in real life, since a lot depends on what you're making and what you can get per hour for it. But for me, a hobbyist for whom glass is an art form and a recreation, or a possible "second career" after retirement, a slower pace of work is not a problem. And as a newbie, I think I prefer it that way.
de@daclarke.org